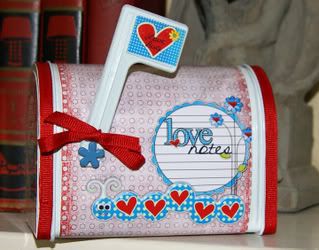
Here's my finished project from the flag side:
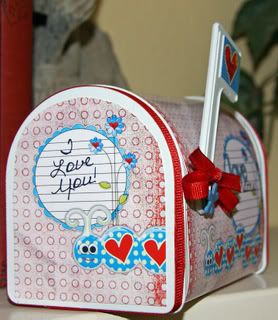
The front
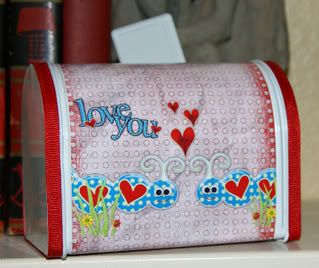
The non-flag side
I used Nikki Beaudreau and Kitty Designs' new collab called Butterfly Girl available at Shabby Pickle Designs to create this project. Check this kit out today for 20% off!

Basic Directions:
Use the Free Template I am providing to you to create your mailbox cover designs.
1. On the long rectangular piece you will see there are two green lines and two black lines. You want to position your design for the sides of the mail box so that they are between these two lines. The green line is the base for each side. Don't forget to rotate your design and put the bottom of the design near the green line so that your design prints right side up for the mail box.
3. I provided two smaller rectangles to be used for the front and back of the mail box. All you need to do is to create your design to fit in the square. The same thing with the Flag piece. You can also duplicate the flag piece so that you have a decorative flag on both sides of the flag piece since you can see it from both sides. (I chose to keep it simple and only use one flag)
4. Print your designs out on your favorite type of paper. I would recommend presentation weight paper for this project, however, I used Glossy photo paper because it is what I had and it gives me the best color.
Assembly: The only thing tricky for assembling this project is getting around the flag pole. After trimming the long rectangular piece and wrapping it around my box (with no adhesive for a dry fit) I snipped where the flag needed to go once I got my position right. All I did was just cut in to where the flag hinge was and then cut a circle based on how big the hinge was. I then slid it in. You can see here the slit and how I tucked the paper in around the flag as much as possible. I would recommend trying this with a piece of scrap paper before you do it with your printed design.
For the front and back door pieces you will need to lay your front piece (that comes off of the mail box) down on the paper and trace on the wrong side. Trim inside the line for the perfect sized piece. Repeat with your back door piece.
Cut out the flag and adhere to the Flag pole. I tied on some ribbon and then used some Monoadhesive around the lip of the doors to adhere some more red ribbon.
That's it - not a hard project at all and you could definitely use up some paper scrapping supplies or stamp this project. It has endless possibilities!
If you give this project a try come back here and link me up so I can leave you some love and feel free to pass along the link to my blog to your friends who might like this project.
Juli
17 comments:
Love this! I have a bunch of these and will be using your template to get some done for Valentine's Day/ Yeah Dollar Spot!!
I am actually on my way to target today and going to check if i can find these. last year i missed the boat!
Thanks for the template and the tute!
What a great project and tutorial! Your's turned out fabulously!
Awesome! Thanks for the template and instructions!!
Wow great project, can't wait to get to Florida next April and do some real shopping at Target!!
LOVELY kit and what a GREAT project!! u did awesome!
What a neat idea. I must share this with my Girl Scout troop - they'll love it!
Beautiful!! I got one yesterday and have done the digi part (thanks for the awesome template!!)
Thank you SO much for creating this template, Juli! I can't wait to tackle the boxes I picked up tonight!
THANKS! I had picked up 3 of these yesterday and was trying to figure out how to get around the flag- the template and instructions are great!
I found you on DigiFree yesterday (also the first day I decided to scrap - ever!) and downloaded the template on a whim - I didn't even think I'd make it to Target anytime soon. But I did get there today and have been working on my very first digiscrap project! Soon, I'll post about it on my blog.
Thanks!!
Thank you so much for the template. We picked up some mailboxes yesterday and plan to play today!!
Hi :) just wanted to say THANKS for the great template and I used it for my mailbox --> here {http://upload.acherryontop.com/gallery_viewer/3,,,,1,/}
I came back since I am ready to make my mailbox and when I clicked on the template, it is not a valid link anymore. Could you possibly reset the link for the late comers? Thanks for the wonderful inspiration!
Very pretty, love the project. So sad that I missed the template :(
I haven't totally completed the project but I put an image of my filled in template on my blog. Thanks again!
Post a Comment