Welcome to the December 15, 2008 edition of digital scrapbooking.
Kelly-Ann Halbert presents Designer Technique December 2008 (Something Blue Studios) posted at Hummie's World.
Kelly-Ann Halbert presents Blogtemplate 4 posted at Youandidigidesign by Fryske.
Tutorials
StarXLR8 presents Getting Started: Printing your digital scrapbooking pages posted at Simple Scrapper, saying, "One in a series of "Getting Started" tips for beginners!"
Andrew Edgington presents 10 Free Articles about Photoshop posted at AdobeArticles, saying, "Grab these 10 free articles about Photoshop Editing Tools."
Andrew Edgington presents Photoshop Elements for Photography Enthusiasts posted at Learn Adobe Elements, saying, "Simple Photoshop ELEMENTS Video Tutorials that will help you conquer Photoshop in no time at all. Take a look at their blog for a free sample video."
Andrew Edgington presents Tips for Zooming in on Your Subject posted at Learn Digital Photography Now, saying, "Tips on how to use a digital camera like a pro. An insider look at the latest digital cameras and in all, a great guide for digital photographers."
StarXLR8 presents Getting Started with Digital Scrapbooking posted at Simple Scrapper.
That concludes this edition. Submit your blog article to the next edition of digital scrapbooking using our carnival submission form. Past posts and future hosts can be found on our blog carnival index page.
Sunday, December 14, 2008
Friday, November 21, 2008
Cards!
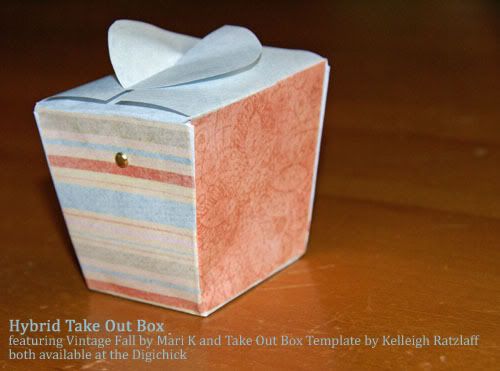
I have some hybrid cards and another little hybrid goodie for you today. These were all made from the same 1 sheet of 8.5 x 11 cardstock like I talked about in yesterday's post.
Snowdrop Soup Cards
When I saw this adorable kit by Nikki Beaudreau at the Shabby Pickle I just knew I had to work with it! You can check out this awesome kit here. Nikki is releasing an add-on to the kit as part of the Pickle Barrell kit coming out soon. If you've never seen the Pickle Barrell kit - it rocks! It's mini kits from each of the awesome Shabby Pickle designers for a really low price. Make sure to check it out around Dec 1st.
To make these cards I simply made myself a little 3.9" x 3.9" template and designed the card front right on that template using drop shadows to make it look like the card is layered with goodies. When the card front was done I merged the layers and copied it over to my 8.5 x 11" canvas for printing. I used some 8x8 Die Cuts with a View papers and just cut them in half, folded and mounted the card front right on the card.
Up close of the owl card - I added some fun red trim by tying it around the card front to make it look more homemade.

Up close of the penquin card (part of the Add On kit) - I punched holes using a handheld Fiskars punch and then put silver brads in backwards so you could see the prongs holding the paper for a different look.

My next card features a cool kit called Mamma Joe by Tamara D at Scrappy Thoughts.

I answered a one kit call for Tamara and ended up getting to work with this awesome kit for her. She's a designer I didn't know yet and it was wonderful to get to use her product for the first time - Thanks Tamara!
A Cute little project for the holidays - Hybrid Wrapped Candles. I used the Snow Girly kit by Angie Kovacs at Elemental Scraps (which is down for a host move right now - more about some exciting things at Elemental Scraps next week) to make this adorable candle.
As you might be able to tell, this is one of those Glade candles for the holidays that I decorated. I'm going to be making a little box to put this in along with a few other things for Katie's Orff teacher for the holidays. I'll post a picture when I get the whole thing done.
To make this I just made strips like with the Robot Can and then made the front square out of a journaling box in the kit. I placed on the snowman so he overlapped the pink journaling box a bit for some interest and then used TK Peking Chicken Fingers font (Digichick) to type Warm Wishes. AGain - easy, peasy and looks impressive when you are done. I used hot glue to adhere to the glass jar.
I hope this gives you a few more ideas for the holidays! Not sure if I'll be here over the weekend or not. Katie has her 10th birthday party tomorrow night (a 4 friend sleepover) and then on Sunday we are having Thanksgiving with my side of the family at my parents' house. I'm also getting ready to host my first Thanksgiving in our new home for Jason's family (my parents and my sister are coming too!). Lots going on in the Fish house right now - just the way I love it!!!
Snowdrop Soup Cards

When I saw this adorable kit by Nikki Beaudreau at the Shabby Pickle I just knew I had to work with it! You can check out this awesome kit here. Nikki is releasing an add-on to the kit as part of the Pickle Barrell kit coming out soon. If you've never seen the Pickle Barrell kit - it rocks! It's mini kits from each of the awesome Shabby Pickle designers for a really low price. Make sure to check it out around Dec 1st.
To make these cards I simply made myself a little 3.9" x 3.9" template and designed the card front right on that template using drop shadows to make it look like the card is layered with goodies. When the card front was done I merged the layers and copied it over to my 8.5 x 11" canvas for printing. I used some 8x8 Die Cuts with a View papers and just cut them in half, folded and mounted the card front right on the card.
Up close of the owl card - I added some fun red trim by tying it around the card front to make it look more homemade.

Up close of the penquin card (part of the Add On kit) - I punched holes using a handheld Fiskars punch and then put silver brads in backwards so you could see the prongs holding the paper for a different look.

My next card features a cool kit called Mamma Joe by Tamara D at Scrappy Thoughts.

I answered a one kit call for Tamara and ended up getting to work with this awesome kit for her. She's a designer I didn't know yet and it was wonderful to get to use her product for the first time - Thanks Tamara!

A Cute little project for the holidays - Hybrid Wrapped Candles. I used the Snow Girly kit by Angie Kovacs at Elemental Scraps (which is down for a host move right now - more about some exciting things at Elemental Scraps next week) to make this adorable candle.

As you might be able to tell, this is one of those Glade candles for the holidays that I decorated. I'm going to be making a little box to put this in along with a few other things for Katie's Orff teacher for the holidays. I'll post a picture when I get the whole thing done.
To make this I just made strips like with the Robot Can and then made the front square out of a journaling box in the kit. I placed on the snowman so he overlapped the pink journaling box a bit for some interest and then used TK Peking Chicken Fingers font (Digichick) to type Warm Wishes. AGain - easy, peasy and looks impressive when you are done. I used hot glue to adhere to the glass jar.
I hope this gives you a few more ideas for the holidays! Not sure if I'll be here over the weekend or not. Katie has her 10th birthday party tomorrow night (a 4 friend sleepover) and then on Sunday we are having Thanksgiving with my side of the family at my parents' house. I'm also getting ready to host my first Thanksgiving in our new home for Jason's family (my parents and my sister are coming too!). Lots going on in the Fish house right now - just the way I love it!!!
Thursday, November 20, 2008
New Projects
Well...I am taking a break from Christmas ornaments. The chipboard and I didn't get along too well. LOL! So...I've been focusing on some little hybrid gifts for the holidays to give to teachers, neighbors, etc. You know, those people you just have to get something for, but can't afford to spend alot. What is better than a homemade, thoughtful gift?
Here are two cute ideas you can convert to any theme you want depending on the papers and elements you choose to go with it.


I made this using a little clear paint can I picked up at Target in the Stationery section. It had some little square gift cards in it (which will be tied together with ribbon and used in my teacher paint cans this year). I used Blast Off digital kit by Kasia Designs and Holly Designs at the Shabby Pickle to make this project.
Details: When I create hybrid projects like this I keep a 8.5 x 11" canvas open in Adobe Elements and as I create each piece I paste it on to the canvas for printing. To make this project I simply measure around the can and realized I would need two 1.25" wide strips of paper to make it around. I then measured the height of the can and designed the circle to fit on the front of the can to help cover one of the seams from the strip of paper going around the can. I chose a 2.5" circle as a template/clipping mask and cut the circle from my choice of paper. I added the star burst (reduced transparency) and the "I Love U a Bot". I created a 3" circle for the top of the lid and then a square tag that I cut to look like it had a unique angle. Everything was printed on glossy photo paper for a really crisp look.
Here is what my 8.5 x 11" canvas looked like for this project and the accent pieces for the one below (plus one more I still need to post). I print all this together and then just cut out and assemble the projects. It saves paper and in my mind ink.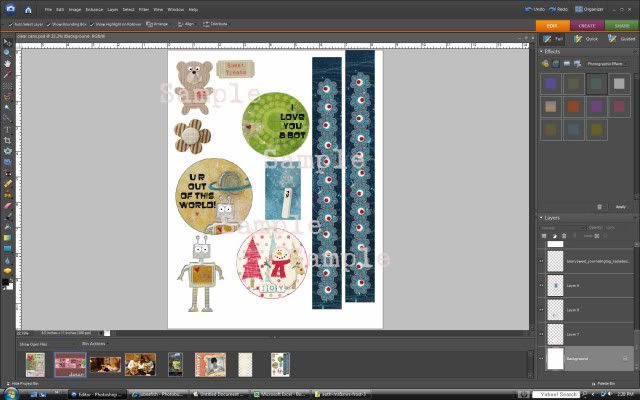
Project #2 is another of Kelleigh Ratzlaff's Tall Boxes - I love these templates! This time I used Kasia's Beary Sweet Kit and a CMS oval cutter to cut a hole in the front of the box. I adhered some transparency inside and made the lid out of cardstock from my stash. The Bear and Ticket were printed with the project above on glossy paper and then adhered with some hot glue, which surprising gave them some dimension off the box. I love happy accidents!
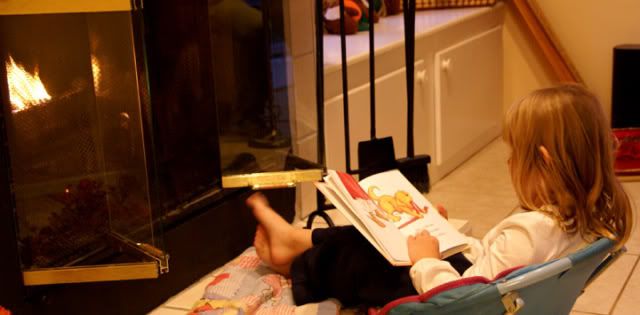
On a non-scrapbooking note the girls and I had a fun night on Monday night. It's been a little cold here for Florida so I had Jason make a fire. Hannah got a yellow star for not following directions in school so she wasn't allowed to watch TV. She chose to put her little naked feet up on her sacred Pooh Blanket by the fire and sat and read a book. I couldn't believe it! So stinkin' sweet!
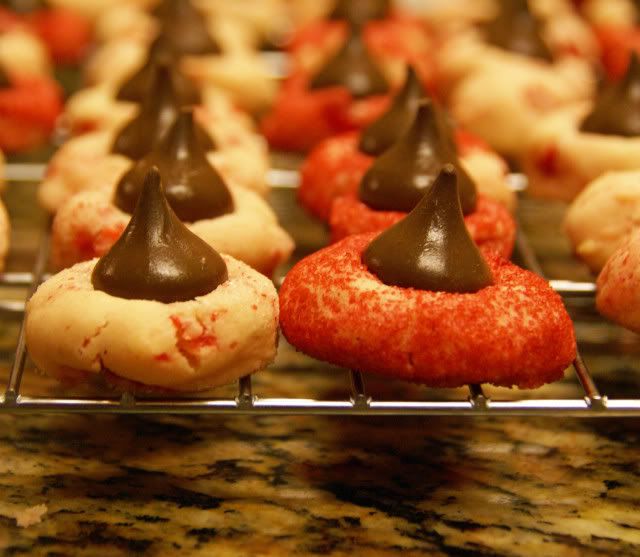
After dinner the girls and I made our first batch of Christmas cookies. We made Cherry Chocolate Blossoms. I really don't need to even help at this point because they both are really good bakers so I stood back and directed while they did all the work and they did a fabulous job (as long as they each had their own task). When all the balls were rolled and baking the girls enjoyed some dough and since this recipe is egg free no worries!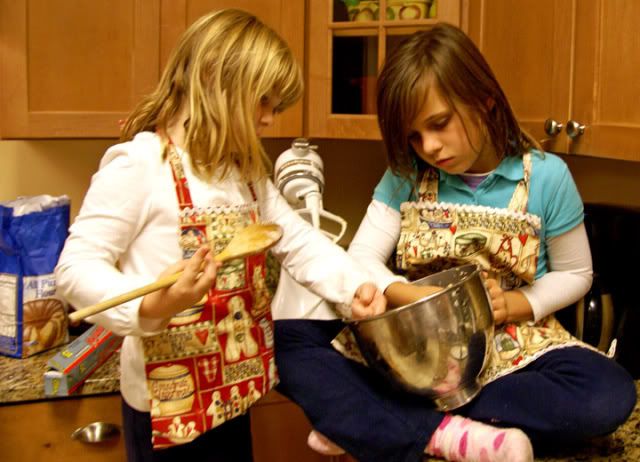
Here's what our cookies looked like when all was said and done. If you want the recipe shoot me a note in the comments and I'll post it if there is enough interest.
Here are two cute ideas you can convert to any theme you want depending on the papers and elements you choose to go with it.
I made this using a little clear paint can I picked up at Target in the Stationery section. It had some little square gift cards in it (which will be tied together with ribbon and used in my teacher paint cans this year). I used Blast Off digital kit by Kasia Designs and Holly Designs at the Shabby Pickle to make this project.
Details: When I create hybrid projects like this I keep a 8.5 x 11" canvas open in Adobe Elements and as I create each piece I paste it on to the canvas for printing. To make this project I simply measure around the can and realized I would need two 1.25" wide strips of paper to make it around. I then measured the height of the can and designed the circle to fit on the front of the can to help cover one of the seams from the strip of paper going around the can. I chose a 2.5" circle as a template/clipping mask and cut the circle from my choice of paper. I added the star burst (reduced transparency) and the "I Love U a Bot". I created a 3" circle for the top of the lid and then a square tag that I cut to look like it had a unique angle. Everything was printed on glossy photo paper for a really crisp look.
Here is what my 8.5 x 11" canvas looked like for this project and the accent pieces for the one below (plus one more I still need to post). I print all this together and then just cut out and assemble the projects. It saves paper and in my mind ink.
Project #2 is another of Kelleigh Ratzlaff's Tall Boxes - I love these templates!
This time I used Kasia's Beary Sweet Kit and a CMS oval cutter to cut a hole in the front of the box. I adhered some transparency inside and made the lid out of cardstock from my stash. The Bear and Ticket were printed with the project above on glossy paper and then adhered with some hot glue, which surprising gave them some dimension off the box. I love happy accidents!On a non-scrapbooking note the girls and I had a fun night on Monday night. It's been a little cold here for Florida so I had Jason make a fire. Hannah got a yellow star for not following directions in school so she wasn't allowed to watch TV. She chose to put her little naked feet up on her sacred Pooh Blanket by the fire and sat and read a book. I couldn't believe it! So stinkin' sweet!
After dinner the girls and I made our first batch of Christmas cookies. We made Cherry Chocolate Blossoms. I really don't need to even help at this point because they both are really good bakers so I stood back and directed while they did all the work and they did a fabulous job (as long as they each had their own task). When all the balls were rolled and baking the girls enjoyed some dough and since this recipe is egg free no worries!
Here's what our cookies looked like when all was said and done. If you want the recipe shoot me a note in the comments and I'll post it if there is enough interest.
Sunday, November 16, 2008
Day 2 - Hybrid Ornaments
Today's ornaments feature box templates that have been scaled down to the perfect size to decorate the tree. The great thing about this type of hybrid ornament is that you can use any kit. Christmas themed or to match your favorite holiday color theme.
The first ornament features Kelleigh Ratzlaff's Tall Box Templates.

I simply used the box template and scaled it down and then decorated using Penny Springmann's Jolly Jingle kit that was just recently retired. To tie the ribbon on I punched a hole in the top and threaded through some ribbon - easy peasy! You make the project as easy or as hard as you want it to be by how decorated you make the box.
My second ornament features the Take Out Box Template by Kelleigh Ratzalff at Digichick, which I scaled down again.

For this ornament I used SaraAmarie and Mandabean's new kit Warm Noses and Toesies (Sweet Shoppe.)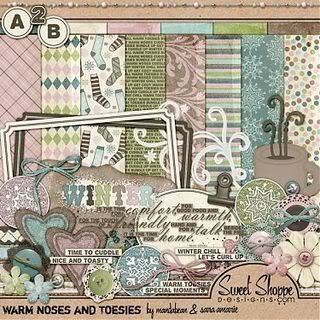
The great thing about this template is that you don't need glue to hold the box together. I just used a silver brad on each side and then used some SU Wire to craft a handle that is attached to each brad. The other thing I did to make this box look more unique was alternate the papers in each section. So the sides where the brad is adhered shows the snowflake complimentary paper that matches the top.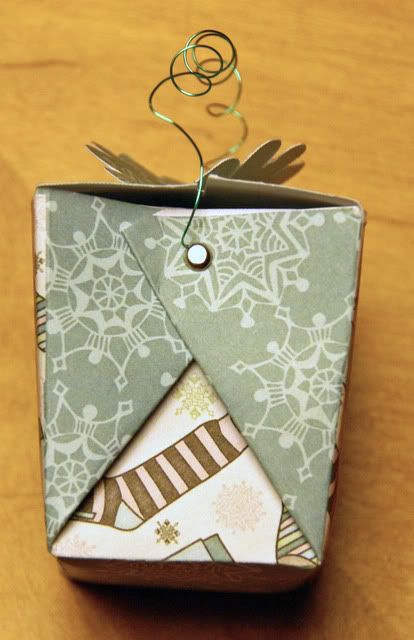
For my final box template ornament I chose to use the Hershey Kiss box from Jersgirl's template site. She has lots of awesome templates on this site! For this one I didn't have to scale it down - I just expanded the template by copying it from the PDF file and pasting it into Elements and then resized to fit 8" across.

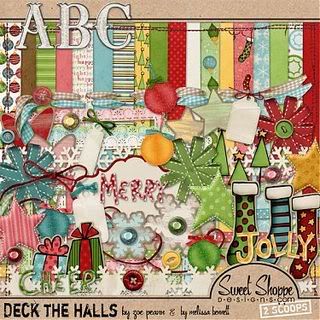
I used Zoe Pearn and Melissa Bennet's new kit Deck The Halls (Sweet Shoppe) to create this fun ornament.
These are super simple and you could fit two on a page easy. To attach the ribbon I just punched a hole in the top of each triangle and then assembled and tied on the ribbon. Again, easy peasy and cute as a button.
Tomorrow I have ornaments that use left over alphabet chipboard as the base for a hybrid ornament. Come back and see what's new!
The first ornament features Kelleigh Ratzlaff's Tall Box Templates.
I simply used the box template and scaled it down and then decorated using Penny Springmann's Jolly Jingle kit that was just recently retired. To tie the ribbon on I punched a hole in the top and threaded through some ribbon - easy peasy! You make the project as easy or as hard as you want it to be by how decorated you make the box.
My second ornament features the Take Out Box Template by Kelleigh Ratzalff at Digichick, which I scaled down again.
For this ornament I used SaraAmarie and Mandabean's new kit Warm Noses and Toesies (Sweet Shoppe.)
The great thing about this template is that you don't need glue to hold the box together. I just used a silver brad on each side and then used some SU Wire to craft a handle that is attached to each brad. The other thing I did to make this box look more unique was alternate the papers in each section. So the sides where the brad is adhered shows the snowflake complimentary paper that matches the top.
For my final box template ornament I chose to use the Hershey Kiss box from Jersgirl's template site. She has lots of awesome templates on this site! For this one I didn't have to scale it down - I just expanded the template by copying it from the PDF file and pasting it into Elements and then resized to fit 8" across.
I used Zoe Pearn and Melissa Bennet's new kit Deck The Halls (Sweet Shoppe) to create this fun ornament.
These are super simple and you could fit two on a page easy. To attach the ribbon I just punched a hole in the top of each triangle and then assembled and tied on the ribbon. Again, easy peasy and cute as a button.
Tomorrow I have ornaments that use left over alphabet chipboard as the base for a hybrid ornament. Come back and see what's new!
Friday, November 14, 2008
Christmas Ornaments - Day 1

I've been trying to make all different kinds of hybrid Christmas ornaments to help decorate our new house. Today's ornament features a great new kit call A Winter's Romance by the fabulous Kasia Designs at Shabby Pickle Designs.
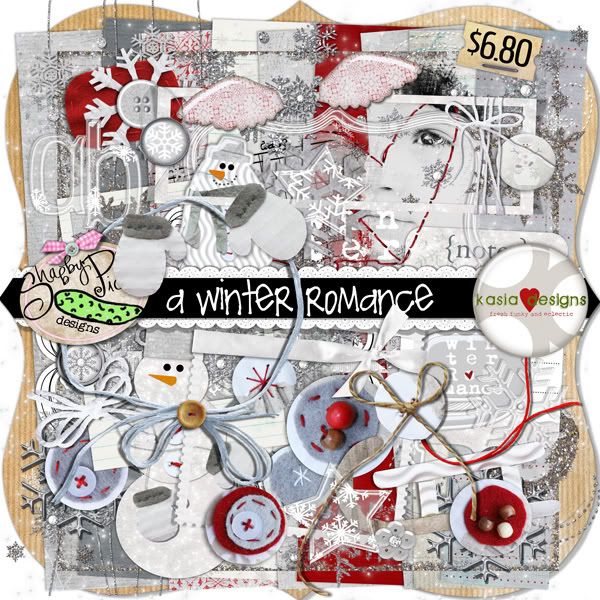
I designed a small layout to fit in the square open space using Adobe Elements and then printed out on SU white cardstock. I cut out the square and adhered to the ornament by applying a thin layer of Mod Podge to both the ornament and the back side of the paper. I then smoothed out the paper and let it rest for a few days. To finish the project I simply put Mod Podge over the top of the paper (I did have some red in bleed but I think it makes it look a little more vintage.) Once dry I used a glue pen and some red glitter to finish off the sides. I tied on a irradescent bow and voila - a cute homemade ornament. It will look great on our red, light blue and silver tree.
Keep coming back. I'll have a new ornament for you each day until I run out of ideas. :)
Thursday, November 13, 2008
Leapin' Lizards and a nifty Thanksgiving basket
Yes, I said leapin' lizards and I'm not referring to the play Annie. We have two new residents in our house - lizards! Yesterday I noticed a small baby lizard in the kitchen and I sort of chased him out to the patio so he could find his way back out to the yard. Well not 20 minutes later I was in the pantry planning dinner and low and behold we seem to have a pantry lizard. I thought he was the lizard I chased out of the house - but no. I think this little guy has been living in the pantry for a few weeks now. He seems to like to sit on the snack bin (3 drawer plastic organizer) and check out the world. I'm thinking about naming him - or should I leave that to the girls?
Would you be freaked out? Yeah, well I'm kind of freaked out but at the same time, this is Florida and the weather has been nice to we keep the back door open for the cats to come and go a they please. I know these lizards are a gift from my dear cat Bella. You see Bella loves lizards! She isn't a normal cat that kills the lizard. No, she likes to play with the lizards. So she brings them in the house and tries to put them somewhere she thinks they won't escape like shoes (theres a gross story for another time) and boxes and apparently the pantry.
We also have a lizard living in our office. Since it's a UF Gator themed office I've been thinking of naming that one Tebow, but he seems pretty scared so I'm not sure that's the right name for him at all. Oh, the joys of living in Florida. (Thankfully none of the lizards have figured out how to climb the stairs, when they do I will NOT be so calm. A lizard in my bed - yikes!)
After my lizard expedition yesterday, I picked up the girls and we drove home the long way so we could talk about what they were wishing for from Santa (Hannah still believes) and what kind of things they want to do to celebrate the Holiday. Katie has a good list of things she wants, but it's not nearly as long as it usually is. Hannah as usual, has no clue what she wants. Whatever Katie says she just says "Oh yeah, I want that too." and then Katie huffs and puffs. Jason and I are going to go over the budget for Christmas tonight. This should be interesting! I've been able to buy pretty much what I wanted for three years now. Going back to a true budget and thinking creatively about what we are giving is going to some work. I think though that our kids and our family understand that we just invested a large sum in a new house and I lost my job (though still have contract work) so there just aren't going to be so many presents this year.
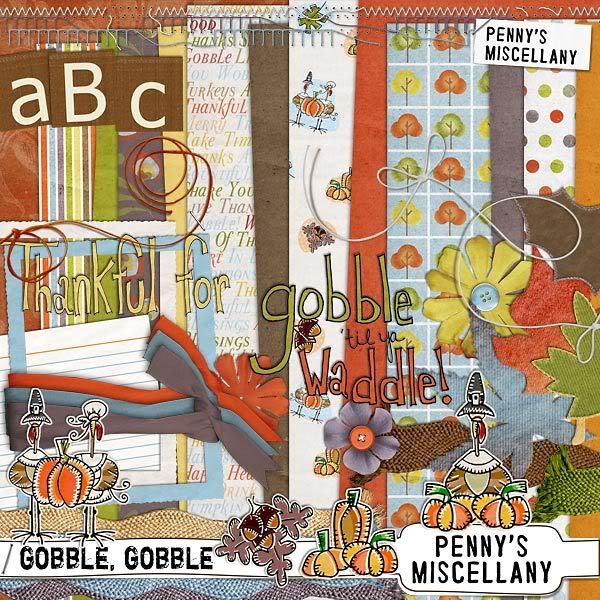
I've been working on ornaments for the trees which I'm planning on posting later this week. I still have some more to finish. Today I worked on a Thanksgiving project for Penny Springmann's CT.

I made this adorable little paper gift basket using Pennny's newest kit call Gobble, Gobble (being released at the re-opening of the Sweet Shoppe on Saturday).
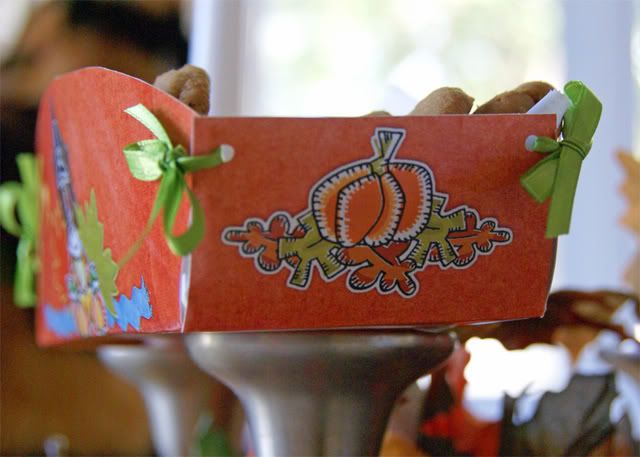
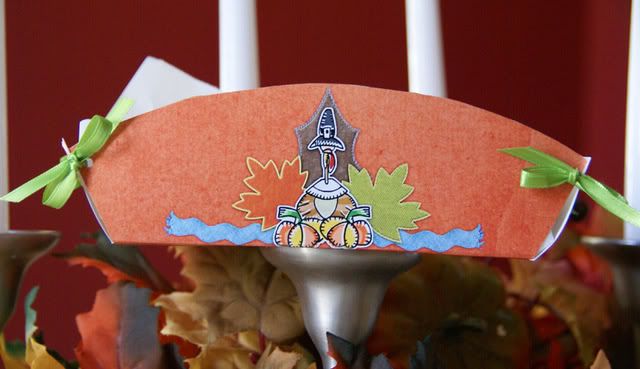
I recently joined Papercrafter's Planet website, which has a ton of great stamping projects. I saw this cute basket and found a template and thought...I can do that with my digi supplies!
I started out with a free template from Mel Stampz Blog. I then copied the template into Elements and used the magnetic lasso tool around the black lines to create a digital template. Then I opened my background paper in it's own file and used the digital template as a clipping mask. I decorated the basket with digital elements and then printed it out on HP Glossy Photo paper. I cut it out, punched the holes as Melanie's blog suggested and tied the box together with some ribbon. The HP logos were showing on the inside so I just lined the basket with parchment paper and then filled it up with cookies. I'm planning on giving these to the other homeroom moms as a little "thanks" next week for Thanksgiving. I think it turned out pretty cute.
Here is a close up of the front and the sides.
I can see these little baskets sized down with little loaves of pound cake or the same size I made filled with votive candles and holder and a covered book of matches of a sweet hostess gift. No matter what you chose to fill this little basket with - I hope you'll give it a try and leave Melanie some love on her Blog to say thanks for the fabulous template and idea!
Have a blessed day!
Would you be freaked out? Yeah, well I'm kind of freaked out but at the same time, this is Florida and the weather has been nice to we keep the back door open for the cats to come and go a they please. I know these lizards are a gift from my dear cat Bella. You see Bella loves lizards! She isn't a normal cat that kills the lizard. No, she likes to play with the lizards. So she brings them in the house and tries to put them somewhere she thinks they won't escape like shoes (theres a gross story for another time) and boxes and apparently the pantry.
We also have a lizard living in our office. Since it's a UF Gator themed office I've been thinking of naming that one Tebow, but he seems pretty scared so I'm not sure that's the right name for him at all. Oh, the joys of living in Florida. (Thankfully none of the lizards have figured out how to climb the stairs, when they do I will NOT be so calm. A lizard in my bed - yikes!)
After my lizard expedition yesterday, I picked up the girls and we drove home the long way so we could talk about what they were wishing for from Santa (Hannah still believes) and what kind of things they want to do to celebrate the Holiday. Katie has a good list of things she wants, but it's not nearly as long as it usually is. Hannah as usual, has no clue what she wants. Whatever Katie says she just says "Oh yeah, I want that too." and then Katie huffs and puffs. Jason and I are going to go over the budget for Christmas tonight. This should be interesting! I've been able to buy pretty much what I wanted for three years now. Going back to a true budget and thinking creatively about what we are giving is going to some work. I think though that our kids and our family understand that we just invested a large sum in a new house and I lost my job (though still have contract work) so there just aren't going to be so many presents this year.
I've been working on ornaments for the trees which I'm planning on posting later this week. I still have some more to finish. Today I worked on a Thanksgiving project for Penny Springmann's CT.
I made this adorable little paper gift basket using Pennny's newest kit call Gobble, Gobble (being released at the re-opening of the Sweet Shoppe on Saturday).
I recently joined Papercrafter's Planet website, which has a ton of great stamping projects. I saw this cute basket and found a template and thought...I can do that with my digi supplies!
I started out with a free template from Mel Stampz Blog. I then copied the template into Elements and used the magnetic lasso tool around the black lines to create a digital template. Then I opened my background paper in it's own file and used the digital template as a clipping mask. I decorated the basket with digital elements and then printed it out on HP Glossy Photo paper. I cut it out, punched the holes as Melanie's blog suggested and tied the box together with some ribbon. The HP logos were showing on the inside so I just lined the basket with parchment paper and then filled it up with cookies. I'm planning on giving these to the other homeroom moms as a little "thanks" next week for Thanksgiving. I think it turned out pretty cute.
Here is a close up of the front and the sides.
I can see these little baskets sized down with little loaves of pound cake or the same size I made filled with votive candles and holder and a covered book of matches of a sweet hostess gift. No matter what you chose to fill this little basket with - I hope you'll give it a try and leave Melanie some love on her Blog to say thanks for the fabulous template and idea!
Have a blessed day!
Monday, November 10, 2008
A Crafty Kind of Sunday
Yesterday was the day after our Housewarming party (which was a blast) and even though it was a gorgeous day out Jason and I hung around the house while the kids played inside and out. I got some projects done which felt good!
First I scrapped this page below for Angie Kovacs and Elemental Scrap’s Birthday Bash this week.
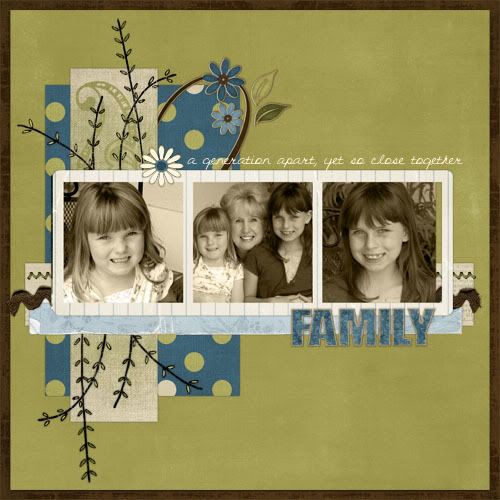
I used Angie's newest 12 x 12 templates that was released today called A Perfect Trio and a collab by Angie and Chrissy W (Elemental Scraps) called Lakehouse.
My second project was finishing Katie’s 10th Birthday Party invites. This started out with me telling Katie we should just buy some invites and get this done. Katie looked at the invites at the store and promptly told me they weren’t really want she wanted and that they were too expensive ($4 a pack). Good news is she’s getting the whole “we’re budgeting our money” thing. Bad news is she has no idea how long I take when I create things, but for my girls I’ll do anything no mater what! Here’s what we ended up with…5 totally adorable pillow box invites for a sleep over where I’m sure I’m not going to get any actual sleep.

I created the boxes last week using Kelleigh Ratzlaff’s Pillow Box Templates and I totally scrap lifted Luann‘s(Wildblueeyez) Hybrid Invites using Stop! Jammer Time from the Sweet Shoppe. Yesterday I created the actual invite and then did all the printing and cutting while we watched National Treasure. (Does anyone else remember what they were watching on TV or listening to when they created a project? Or is that a me thing?)
Here’s the actual invite I made, which went inside the pillow box.
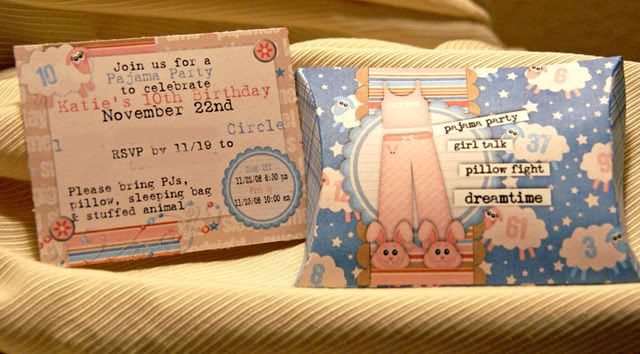
If you like my project then please leave Luann some love HERE as I would never have gotten these done had it not been for her awesome project and the ability to scrap lift as needed. Here is her orignial version.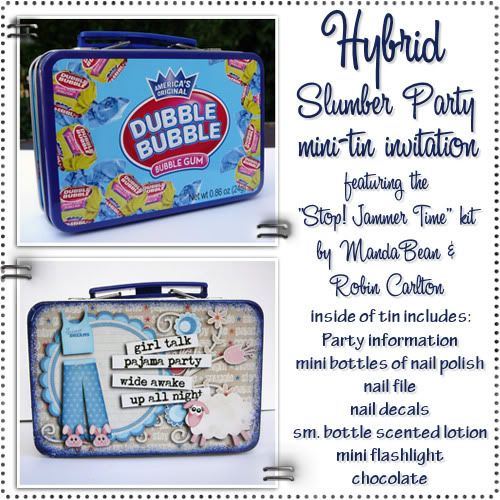
Luann my friend - you ROCK!
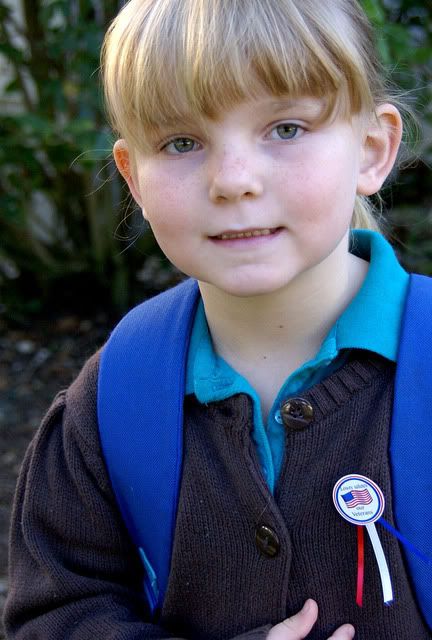
My final project was making 25 pins for Katie’s class. Today they are having a class presentation honoring those that serve in the military and veterans in honor of Veteran’s Day tomorrow. Katie has memorized a long poem about the Flag that she will be reciting. The class also has a person from each branch of the military coming to speak and they will be honoring all veterans that are no longer with us. It sounds like a pretty big production. My contribution was some mini bagels and cream cheese along with these simple pins.
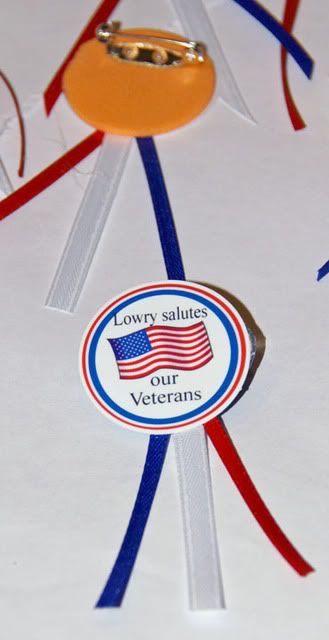
These are super simple. I created the circle in Adobe Elements and then queued them up on a 8.5 x 11” sheet and printed on HP glossy photo paper for good color. Jason helped me punch them all out using my 1.5” hole punch. I had envisioned making ribbons using 1 ribbon that was red, white, and blue and then putting the circle in the middle. Well, Michael’s had other plans for me. I not only couldn’t find any red, white and blue striped ribbon but there were also no circle woodsies for me to mount on. I got crafty and picked up some of the skinny ribbon that was 5/$1 in red, white and blue and some pin backs. At home we had foam circles just the right size. I just hot glued the ribbon to the foam circle and then put the punched circle over that. I flipped them over and glued on the pin.
Hannah had a field trip today, but decided she wanted one to wear and offered to be my model this morning.
Now, off to stamp a thank you card and get started on a paint can project that I promise to share when it’s done.
First I scrapped this page below for Angie Kovacs and Elemental Scrap’s Birthday Bash this week.
I used Angie's newest 12 x 12 templates that was released today called A Perfect Trio and a collab by Angie and Chrissy W (Elemental Scraps) called Lakehouse.
My second project was finishing Katie’s 10th Birthday Party invites. This started out with me telling Katie we should just buy some invites and get this done. Katie looked at the invites at the store and promptly told me they weren’t really want she wanted and that they were too expensive ($4 a pack). Good news is she’s getting the whole “we’re budgeting our money” thing. Bad news is she has no idea how long I take when I create things, but for my girls I’ll do anything no mater what! Here’s what we ended up with…5 totally adorable pillow box invites for a sleep over where I’m sure I’m not going to get any actual sleep.
I created the boxes last week using Kelleigh Ratzlaff’s Pillow Box Templates and I totally scrap lifted Luann‘s(Wildblueeyez) Hybrid Invites using Stop! Jammer Time from the Sweet Shoppe. Yesterday I created the actual invite and then did all the printing and cutting while we watched National Treasure. (Does anyone else remember what they were watching on TV or listening to when they created a project? Or is that a me thing?)
Here’s the actual invite I made, which went inside the pillow box.
If you like my project then please leave Luann some love HERE as I would never have gotten these done had it not been for her awesome project and the ability to scrap lift as needed. Here is her orignial version.
Luann my friend - you ROCK!
My final project was making 25 pins for Katie’s class. Today they are having a class presentation honoring those that serve in the military and veterans in honor of Veteran’s Day tomorrow. Katie has memorized a long poem about the Flag that she will be reciting. The class also has a person from each branch of the military coming to speak and they will be honoring all veterans that are no longer with us. It sounds like a pretty big production. My contribution was some mini bagels and cream cheese along with these simple pins.
These are super simple. I created the circle in Adobe Elements and then queued them up on a 8.5 x 11” sheet and printed on HP glossy photo paper for good color. Jason helped me punch them all out using my 1.5” hole punch. I had envisioned making ribbons using 1 ribbon that was red, white, and blue and then putting the circle in the middle. Well, Michael’s had other plans for me. I not only couldn’t find any red, white and blue striped ribbon but there were also no circle woodsies for me to mount on. I got crafty and picked up some of the skinny ribbon that was 5/$1 in red, white and blue and some pin backs. At home we had foam circles just the right size. I just hot glued the ribbon to the foam circle and then put the punched circle over that. I flipped them over and glued on the pin.
Hannah had a field trip today, but decided she wanted one to wear and offered to be my model this morning.
Now, off to stamp a thank you card and get started on a paint can project that I promise to share when it’s done.
Saturday, November 01, 2008
It is November already?
Happy the Day After Halloween!
Wow, I can’t believe how fast October flew by this year. I have to say that we had a blast. To start November off on the right note, I dutifully did my after Halloween shopping at Target this year and we are now full stocked on all sorts of plastic storage for the kitchen. This is kind of an annual tradition I have. I love to shop after the holidays and find things that are inexpensive that we can use all year. It certainly helps the budget!
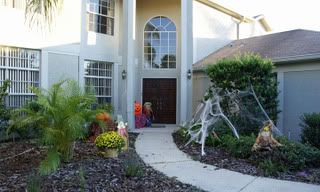
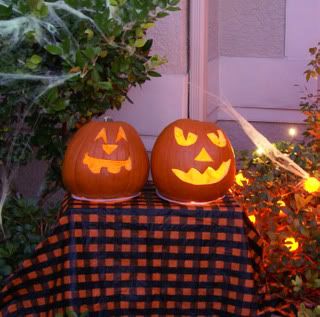
The day before Halloween I finally got into the mood and had the girls help me decorate out front. I think this year is the first time we ever really decorated for Halloween - it was fun!
My sister came over earlier in the week and helped carve pumpkins. Didn't they turn out great?
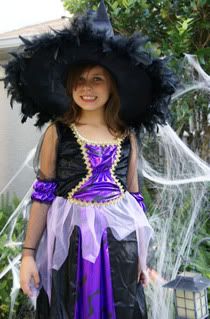
The girls picked different costumes this year. Last year they were both pirates. Katie decided to be a witch (she’s been reading the Harry Potter series and is seriously into pretending magic and potions).
Hannah decided to be a Buc’s cheerleader and thanks to Katie’s friend Erica, we didn’t have to buy a costume for Hannah. Katie was sweet and did Hannah’s hair for her and Grandma Sue was here to tie in the ribbon.
I’m excited that our house warming party is in one week and boy do we have a lot to do - I hope I can get Jason off the couch to get some work done in the yard. The inside stuff I can do myself! Looking forward to the party I’m trying to finish up a little hybrid album to display with some recent pictures of the girls. Here’s the few pages I’ve made so far.
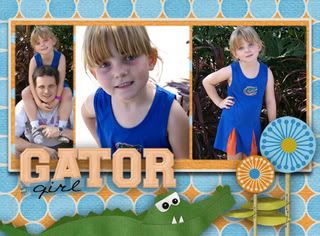
I used Julie Bullock's Tart n' Tangy (Shabby Pickle), Varsity Pewter Alpha from As You Wish Designs (Shabby Pickle), A Trip to the Zoo by Megan Fisher (Digichick)

I used Zoe Pearn's new Persimmon kit for this one.
I hope everyone has a great weekend - it's time for me to go clean. Bleh!
Wow, I can’t believe how fast October flew by this year. I have to say that we had a blast. To start November off on the right note, I dutifully did my after Halloween shopping at Target this year and we are now full stocked on all sorts of plastic storage for the kitchen. This is kind of an annual tradition I have. I love to shop after the holidays and find things that are inexpensive that we can use all year. It certainly helps the budget!
The day before Halloween I finally got into the mood and had the girls help me decorate out front. I think this year is the first time we ever really decorated for Halloween - it was fun!
My sister came over earlier in the week and helped carve pumpkins. Didn't they turn out great?
The girls picked different costumes this year. Last year they were both pirates. Katie decided to be a witch (she’s been reading the Harry Potter series and is seriously into pretending magic and potions).
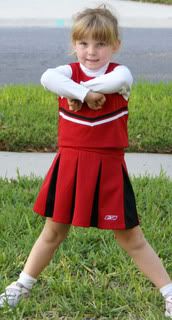
Hannah decided to be a Buc’s cheerleader and thanks to Katie’s friend Erica, we didn’t have to buy a costume for Hannah. Katie was sweet and did Hannah’s hair for her and Grandma Sue was here to tie in the ribbon.
I’m excited that our house warming party is in one week and boy do we have a lot to do - I hope I can get Jason off the couch to get some work done in the yard. The inside stuff I can do myself! Looking forward to the party I’m trying to finish up a little hybrid album to display with some recent pictures of the girls. Here’s the few pages I’ve made so far.
I used Julie Bullock's Tart n' Tangy (Shabby Pickle), Varsity Pewter Alpha from As You Wish Designs (Shabby Pickle), A Trip to the Zoo by Megan Fisher (Digichick)
I used Zoe Pearn's new Persimmon kit for this one.
I hope everyone has a great weekend - it's time for me to go clean. Bleh!
Tuesday, October 28, 2008
Fall Projects - Hybrid Boxes
I'm totally excited that Kelleigh Ratzlaff agreed to let me me on her CT. (Yeah, I stalked her until she said yes. LOL!) She makes the most amazing hybrid box and card templates and she herself is one kick butt hybrid scrapper. I realized as I'm posting my projects that others in the digi community are asking questions about how the templates work and I'm sure they are worried that they are going to buy the template and not be sure what to do with it -soooo here's a bunch of projects and tips using Kelleigh's awesome boxes.
The Owl Boxes - A take out box on the left and a pillow box on the right.

TIP: The pillow box is super easy to make, the true trick is making sure your score lines follow the guides. To make it so you don't have to print the guides on your project I highly suggest printing the guide/scoring lines on plain white copy paper in black. Before scoring I place my guide sheet over my project making sure that everything lines up. Then I press hard while I score my lines and I score through both the copy paper and the paper I printed my finish box on. Easy as pie!
TIP: For the Take Out Box the first time I made it I pasted the flaps inside the box rather than outside. This gives the box a totally different look as you can see below. You can do it either way depending on the look you want. I have to say though that the box is much easier to construct if you put the flaps on the outside. I held the box together by using my Crop-a-dile to punch a hole in the side of the box where the two flaps overlap and then used a simple gold star brad to hold all the layers together. This is so much easier then trying to glue it together. Here's my ooops box.
TIP: The size of the box is adjustable, so unlike the plastic templates you buy to make with traditional scrapbook paper, you can alter the size. If you have access to large format printer this means you can make really big boxes. For the rest of us with normal ink jet printers it means that we can make cute little boxes. Just remember that if you use the first tip and then you re-size your box you'll need a new folding template. I high suggest some kind of file to keep your scoring templates in so you don't have to reprint each time you make a project.
Speaking of re-sized boxes here's a project where I used the Fancy Bags template and reduced the size of the template and then duplicated the layer so I had two bags on one piece of standard cardstock. I used two different digi kits to make the bags so I had to different finished projects. (I actually printed these little bags on standard copy paper to make it easier to fold them.)
Little Hybrid Fancy Bags (That is an espresso cup)

Regular Sized Fancy Bag (sorry I didn't leave anything to show scale)

TIP: My only tip for the fancy bags is if you make smaller bags use the lighter weight paper, but make sure you don't score right through the paper like I did on a few samples. Also, don't be afraid to really decorate them up.
My favorite template so far as been the Tall Box Template. I find these templates so easy to customize and make the most adorable boxes. Plus, I used the HP Laser Printer at my old job to print most of these and the color turned out incredible! I did print these on cardstock and so you are aware the top prints on a separate sheet from the bottom.
TIP: When printing multiple Tall Boxes group the tops together on one 8.5" x 11" sheet so that you don't waste paper. Also, decorate up the lid, there is plenty of room to play up there on the top section. Just make sure you take a look at the guide to see how far in the score marks go.
TIP: While you are decorating up the top with digital embellishments you can also make yourself an easy to print tag to add to your box. The ideas are endless on how you can use this template!
Here are some of my samples using Kelleigh's Tall Box Templates


Think outside, or rather inside, the box with what you can do with these templates. You can make all sorts of different little gift containers for the holidays or little treat bags for Thanksgiving, the choir, teachers, neighbors, etc. I'd love to see what you made using any kind of box template and digital papers, or if you're a traditional scrapper for that matter. The fact is that I love paper and love to make little things with paper so link me up in the comments to your favorite box project for some inspiration.
If you'd like to check out Kelleigh's templates you can see them at the Digichick
http://www.thedigichick.com/shop/manufacturers.php?manufacturerid=72&catid=268&dsefu=off
Have a great day!
The Owl Boxes - A take out box on the left and a pillow box on the right.
TIP: The pillow box is super easy to make, the true trick is making sure your score lines follow the guides. To make it so you don't have to print the guides on your project I highly suggest printing the guide/scoring lines on plain white copy paper in black. Before scoring I place my guide sheet over my project making sure that everything lines up. Then I press hard while I score my lines and I score through both the copy paper and the paper I printed my finish box on. Easy as pie!
TIP: For the Take Out Box the first time I made it I pasted the flaps inside the box rather than outside. This gives the box a totally different look as you can see below. You can do it either way depending on the look you want. I have to say though that the box is much easier to construct if you put the flaps on the outside. I held the box together by using my Crop-a-dile to punch a hole in the side of the box where the two flaps overlap and then used a simple gold star brad to hold all the layers together. This is so much easier then trying to glue it together. Here's my ooops box.
TIP: The size of the box is adjustable, so unlike the plastic templates you buy to make with traditional scrapbook paper, you can alter the size. If you have access to large format printer this means you can make really big boxes. For the rest of us with normal ink jet printers it means that we can make cute little boxes. Just remember that if you use the first tip and then you re-size your box you'll need a new folding template. I high suggest some kind of file to keep your scoring templates in so you don't have to reprint each time you make a project.
Speaking of re-sized boxes here's a project where I used the Fancy Bags template and reduced the size of the template and then duplicated the layer so I had two bags on one piece of standard cardstock. I used two different digi kits to make the bags so I had to different finished projects. (I actually printed these little bags on standard copy paper to make it easier to fold them.)
Little Hybrid Fancy Bags (That is an espresso cup)
Regular Sized Fancy Bag (sorry I didn't leave anything to show scale)
TIP: My only tip for the fancy bags is if you make smaller bags use the lighter weight paper, but make sure you don't score right through the paper like I did on a few samples. Also, don't be afraid to really decorate them up.
My favorite template so far as been the Tall Box Template. I find these templates so easy to customize and make the most adorable boxes. Plus, I used the HP Laser Printer at my old job to print most of these and the color turned out incredible! I did print these on cardstock and so you are aware the top prints on a separate sheet from the bottom.
TIP: When printing multiple Tall Boxes group the tops together on one 8.5" x 11" sheet so that you don't waste paper. Also, decorate up the lid, there is plenty of room to play up there on the top section. Just make sure you take a look at the guide to see how far in the score marks go.
TIP: While you are decorating up the top with digital embellishments you can also make yourself an easy to print tag to add to your box. The ideas are endless on how you can use this template!
Here are some of my samples using Kelleigh's Tall Box Templates
Think outside, or rather inside, the box with what you can do with these templates. You can make all sorts of different little gift containers for the holidays or little treat bags for Thanksgiving, the choir, teachers, neighbors, etc. I'd love to see what you made using any kind of box template and digital papers, or if you're a traditional scrapper for that matter. The fact is that I love paper and love to make little things with paper so link me up in the comments to your favorite box project for some inspiration.
If you'd like to check out Kelleigh's templates you can see them at the Digichick
http://www.thedigichick.com/shop/manufacturers.php?manufacturerid=72&catid=268&dsefu=off
Have a great day!
Monday, October 27, 2008
A "Fresh" Start
Since I'm home looking for a new job I thought I'd freshen things up a bit around here and really make this blog my own. So, thanks to the fabulous Zoe Pearn (who's CT I've been on for the last 2 years) I got myself a nice looking blog. Check out Zoe's awesome designs at the Sweet Shoppe!
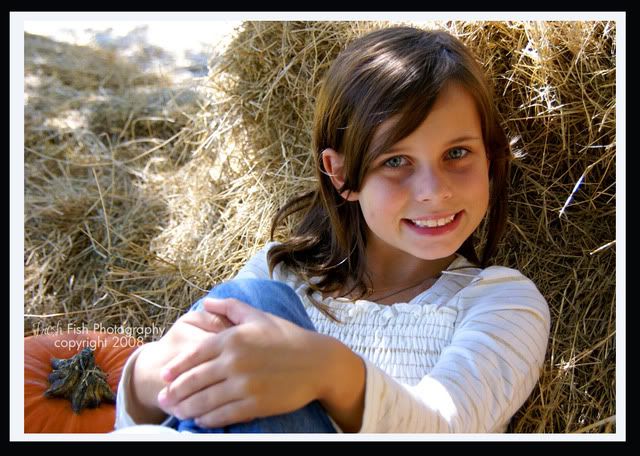
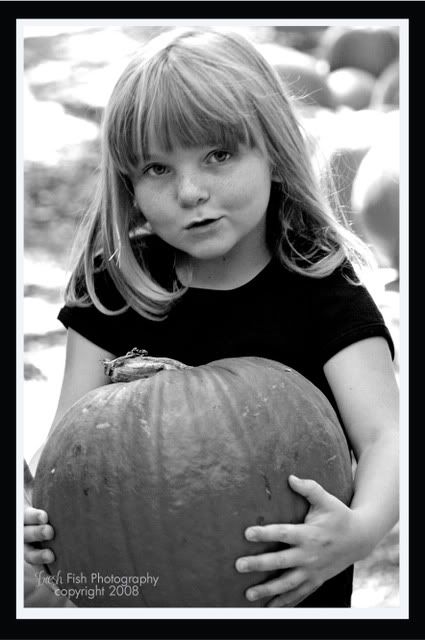
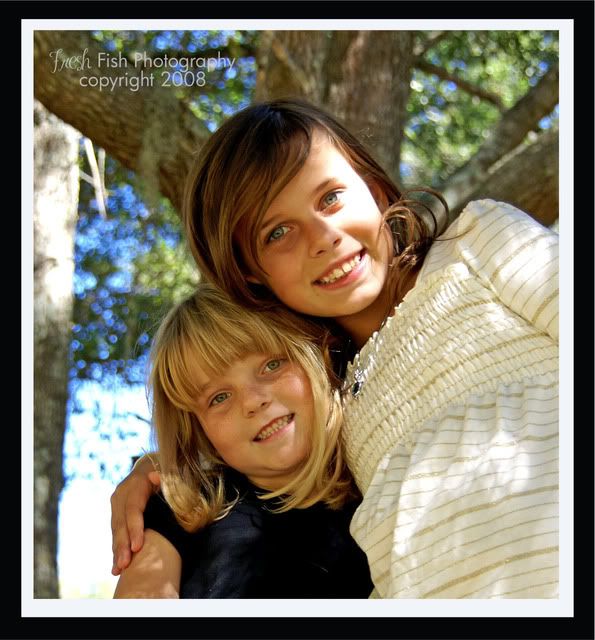
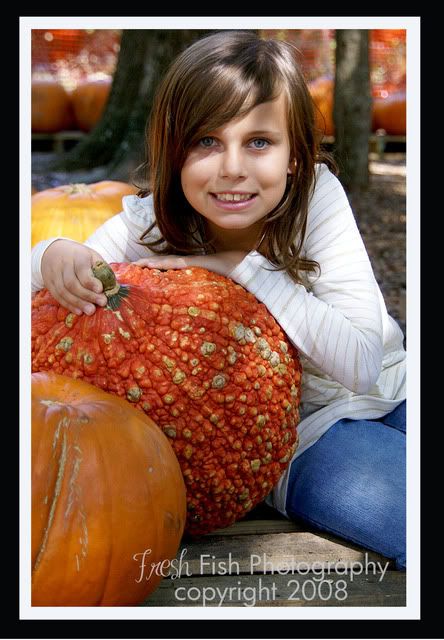
Over the weekend we did our annual trip to the Boy Scout Pumpking Patch for pictures. Last year I forgot my compact flash card and didn't get any pictures (for which I was very peeved!). This year Jason declined to join us (gee, I wonder why) and the girls and I set out for what ended up being a fun trip. After explaining to the girls that the whole point of this trip was to get some really good pictures for Christmas presents this year and that it would save us some money those two little stinkers surprised me and cooperated fully. (Yeah, I nearly fainted right there in patch. LOL!) At first they were a little stiff, but as soon as I let them climb up on the hay stacks and jump off they were good to go.
Here's how some of the editted shots turned out:

I've also been a crafty little bee this morning and decided to give Arts Cow a whirl and see how their free credits work. I have to be honest that the shipping prices are a bit high, but really it's comparable with Shutterfly when all is said and done. I ended up making myself a 8x8 photo book of our recent Bahamas Cruise, 2 decks of playing cards (for Jason's side of the family) and 2 round ornaments. Here is what the artwork for the ornaments looks like
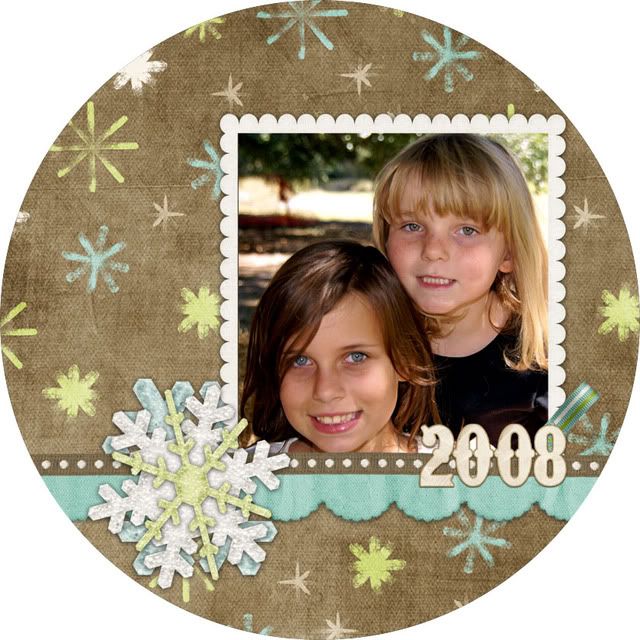
I can't wait to see how they turn out! If you'd like to check out Arts Cow's fabulous free credits for photo gifts go to ARTS COW from here and get 3, yes I said 3! FREE 8x8 photo books and 1200 FREE prints, you only pay for shipping! Also, check out thier forums. There are lots of people who give away their unused photo gift credits which makes for a terrific opportunity to make lots of great gifts cheap.
Check back later today for some fall projects I'm working on.
Subscribe to:
Posts (Atom)