Friday, November 02, 2012

Gratitude Mini Album - Day 1 Review

Come join us over at the Sweet Shoppe here to join in the conversations about creating a mini Gratitude album.  Here are some great first day pages and covers that are being shared in the thread.

This cover by Heather is really fun and I love the texture to it!


This is Monica's first day - I love that she is using Janet Phillip's templates - I'm thinking I might have to find a way to mix these in to my own album!


This is Jessica's day one page - I love the dark background with the bright pops of color!


I cannot begin to tell you how excited I am that all of you are playing along!  Come chat with us at the Sweet Shoppe (even if you aren't using all Sweet Shoppe supplies)!!!!

Here is my day 2 page -


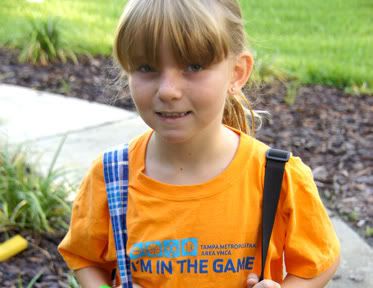
 I'm thankful that my daughters each have their own activities that fit their personalities.  My oldest is 13 and she is part of the YMCA Teen Leadership group.  She's actually the Treasurer for the group, which blows my mind since the kids are 12-18.  I think it shows her leadership potential!   My youngest is 10 and she plays flag footbal at the YMCA. She is the team captain and has really blossomed as a leader this year on the field.   It makes this mom's heart happy!


Looking forward to days 3 and 4 which will be posted on Sunday! Come back and visit again.

Wednesday, October 31, 2012

Gratitude Mini Album Project

The last few years I've taken the time to post on Facebook each day in November something I'm thankful for.  Some days it's something trivial, other days it's something deep and meaningful.  I decided this year I want to better document the things I am thankful for so I'm creating my own mini Gratitude Album.  I want you to come play along!!!!

I have learned that the more simple I keep my project the more likely I am to get it done.  If I didn't have a plan there is no way I'd finish a 30 day album.  To keep it easy, I decided to go the route of using a template.  I grabbed Meghan Mullens' and Darcy Baldwins' Count Your Blessings Template Album to use for my 30 day album as well as Meghan Mullens' Count Your Blessing kit so I can add matching elements to keep each page looking fresh. The template provides you with some photo pages and journaling only pages which you can switch up to make the album the way you like it. 

I am creating each page digitally and then printing it out on my laser printer on to glossy laser paper.  I then trim and mount to cardstock.  I'll bind it with book ring.  It's going to get thick so I think I'll go front and back once I get past day one.

Here is what my title page and first page look like.


I've been asking my kids to help me think of ideas ahead of time so I have some working ideas in case I can't think of what to scrap each day.  I'm also giving myself the permission to scrap a few days ahead so that I am sure I'll finish the project.  If I end up with more than 30 things I'm grateful for then that's a bonus for me!


Here are some other ideas of how to make a hybrid graditute mini album -
  • Use a pre-bound journal and decorate the front cover.  Then write a little bit each day about what you are thankful for.
  • Use a Smashbook and create a collage every few days to show what you are thankful for.
  • Make 4 x 6 sized pages and send them out to a traditional photo print shop (Walgreens, Shutterfly, etc) and then bind them using a book binding ring.
  • Use pre-made templates to scrap your gratitude and then send them all to a company to get a photobook made. 
  • You could create art journal pages and then print and put in a pre-purchased 8 x 8 or 12 x 12 album.
If you are looking for another great template Janet Phillip's 30 Days of Thanks templates came out for DSD and they are great! - she gives you a cute way to document the whole month of November in a simple, easy way!

I hope this inspires you to play along with me.  Come over to the Sweet Shoppe forum here and link me up to your Gratitude mini album as you make it.  I'd love to inspire and encourage each other so we all get this projected completed before December is knocking on our door!

Monday, October 22, 2012

Everyday I'm Shufflin...

I went on a digi scrapping streak this past week.  Look at what I've been up to. :)

For the Lillypad BYOC Challenge - I just love Shawna Clingerman's Bliss kit and Kim Jensen's Cardboard Alphabet!

This little Boo box is the perfect size to put in a handful of treats to give to a teacher or co-worker!  I made this with In Your Nightmares digital kit by Traci Reed and Jady Day Studios (sweet shoppe) and Kelleigh Ratzlaff's Top Heavy Box template (digichick) which is one of my all time favorite box templates!

This cute little hedgehog box was made for Kelleigh Ratzlaff's online class about papercrafting.  It uses her Soap Box template (digichick) and Rotten to the Core by Julie Billingsley and Meghan Mullens (sweet shoppe)

Another fun layout with pics from Hannah's 10th birthday at Disney Quest.  I used Zoe Pearn's Live Out Loud kit (sweet shoppe) which is a great mix of neutral/white papers and bright pops of color elements for the perfect mix of traditional Zoe and art journaling.

This very simple layout features a pic from our recent visit to the Mojave Desert.  Yeah - it was only 48 degrees in the desert much to our surprise!  I used Homemade Memories by Caroline S, Valorie Brown and Flutter Expressions (one story down). 

I'm not big on multi-photo layouts, but for the Lillypad Product challenge I couldn't resist.  I used Boo-tiful Night digital kit by Erica Zane and Kaye Wineicki (sweet shoppe and lillypad). 

This has to be my favorite layout I've made this year!!!  This layout features Studio's Basic's Addicted to Lists kits that is free with a $10 purchase at Sweet Shoppe through the end of October 2012.  This is my attempt at art journaling and list making thrown together.  I think it's a neat way to document what it takes to go out of town on a whirlwind trip.

Finally I have my first page in Hannah's flag football album for this season.  Loving the Project Life format - makes it so easy!  Now if I can just keep it going.  I used lots of goodies from Michelle Godin (Teenage Boy Papers, Varsity Alpha, Handcarved Stamps) plus some pocket pages by Valorie at the Lillypad. 

Monday, September 10, 2012

Disney Quest Birthday Party

We hosted my daughter's 10th birthday at Disney Quest at Downtown Disney (part of Walt Disney World) in Orlando over the weekend. Here's a link to the whole story and some additional pictures from the event :  SSD Blog.  My daughter declared that it was her best birthday ever - so I will chalk that up to a huge success!
Here are a few of the things I made that helped make this birthday party such a success. 
 
Invitation using Be Our Guest digital scrapbook kit by Libby Pritchett and Dream Come True by Julie Billingsley (both at Sweet Shoppe Designs)


Personalized key chains  for the girls to hang on their backpacks.
 
Party favor buckets (from the Dollar Tree) that we decorated with Mickey Mouse heads cut by the Cricut and personalized with Cricut cut letters.

Wednesday, August 22, 2012

Blog Hop - Back To School Style!

Welcome to Kelleigh Ratzlaff's Creative Team Back To School Blog Hop

Here's my project.  I used Kelleigh's Gable Box template which is being re-released at the Digichick on Friday.  I dressed it up digitally with Got Chemistry by Jady Day Studio and Meghan Mullens.  Then simply printed on my laser printer, trimmed, and assembled.  Easy, peasy and I look like an amazing mom.   What a fun little box to give to your child's science teacher!


Want more back to school inspiration? Visit these blogs for more awesome projects!

Donna - www.scrappydonna.blogspot.com


Be sure to leave a comment on each of the blogs! Kelleigh will choose one random comment from one random blog to win $10 to her store!

AND, leave a comment on Kelleigh's blog telling her which of the projects was your favorite! One random commenter will be chosen to win $10 to my store!

Winners will be announced on Monday morning! Have fun hopping! And enjoy going back-to-school!

Back To School Owl Box


I love the variety of back to school kits available this year.  Especially the number of them with owls included!!!  I do love me some owls.  This is a super easy project that is perfect for the first day of school.  I simply decorated a digital template using a digital scrapbook kit and then printed and assembled - easy as pie!

Here are the supplies I used -
School Rules by Mari Koelegenberg (Sweet Shoppe)
DIY Popcorn Box template - Heather Roselli (Sweet Shoppe)
White cardstock
Laser Printer
Scissors
Scoring tool
Double Stick Tape

All the directions you need are included in the Heather's Popcorn Box templates available at the Sweet Shoppe.  Now all I have to do is decide what to put inside!

Wednesday, August 15, 2012

Project Life: Vacation Style

I've been working on our vacation album using the Project Life style layouts.  I thought this would be a fun way to document our trip.  I'm loving the results, however, it's definitely a labor of love!!! 
Here is what I have done so far - this is all done using digital scrapbook supplies.  I hope to scan in some of our memoriabilia to add in the digital album.  My daughter Katie and I are also working on Smash books with some of the cool stuff we brought home.


Day 1 Left & Right


First Day - Night - Left

I'm hoping to get a few more pages done each week so check back.  I'd love to hear your comments on how you think this album is coming along!!!  If you are looking for a list of supplies for this just let me know - the list is about a mile long at this point. 

Friday, September 23, 2011

Halloween Hybrid Boo Package


Yeah for the first day of Fall!!!! It's my favorite time of year!  To celebrate I put together a little Boo package to give to a co-worker to kick of the annual giving of a little Boo gift around the office (works great in neighborhoods too!)

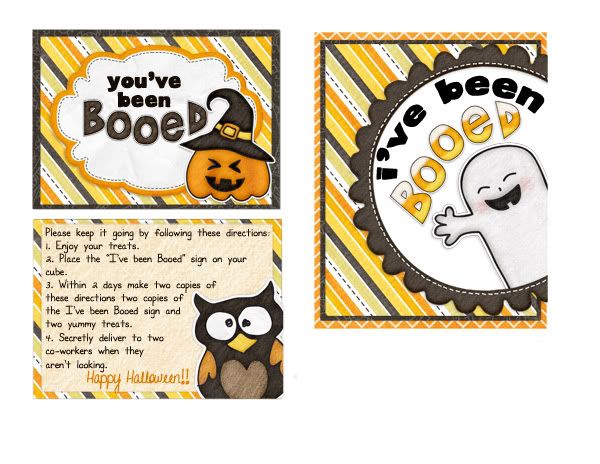
This project was very simple to create!  I used Lliella's Designs Halloween Doodles digital kit to create the card on the top of the box and the "I've been Booed" sheet inside.  Using Photoshop Elements I created the outside and inside card panels which were affixed to a orange cardstock card on the top.  I create the "I've been Booed" sheet on the same print sheet (also in Elements) so I only needed to print one time.  Here's what my print sheet looked like:
After printing I trimmed, mounted and was ready to fill my recycled product box.  Inside the box I tucked a bag of the Brach's Autumn mix (a classic Fall treat in my book) and some homemade ginger cookies tied with white sheer ribbon.  To tie the box closed I cut two slits in the front of the box and slid the ribbon through the holes and tied.  The black ribbon and button were hot glued on.

Here's some more pics of this fun project.  I hope you will give it a try!!!


Monday, August 01, 2011

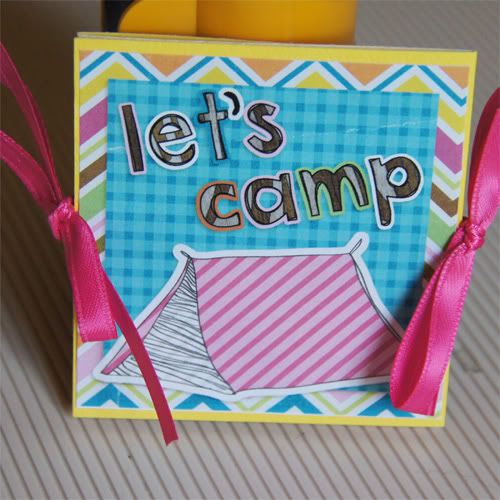
Let's Camp Invites

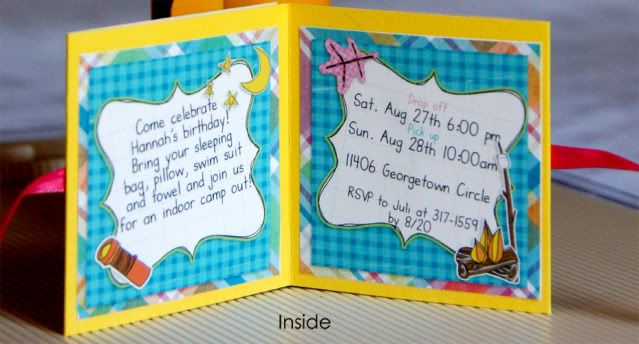
This is my daughter Hannah.  She is my baby, little sporty girl, THE ultimate daddy's girl and she's turning 9 in a few weeks. (I can't believe it!)  After spending months talking about what kind of birthday party she wanted to have this year, she finally settled on having her first sleep over party at our house.  She chose a camping theme and we agreed on only inviting 3 friends to keep things civil. (I've learned from experience that with sleep overs less is more!)

Now it's my turn to think of ways to use the camping theme to turn this into a really fun party for my special girl, her friends and my two assistants (my older daughter Katie and Katie's BFF Nikki).  Hannah hired Katie and Nikki to be her personal party assistants.  They are in charge of treating Hannah and her friends like gold while providing lots of fun and entertainment - certainly seems like a good deal to me.  $15 for two party entertainers for a whole night....wow!

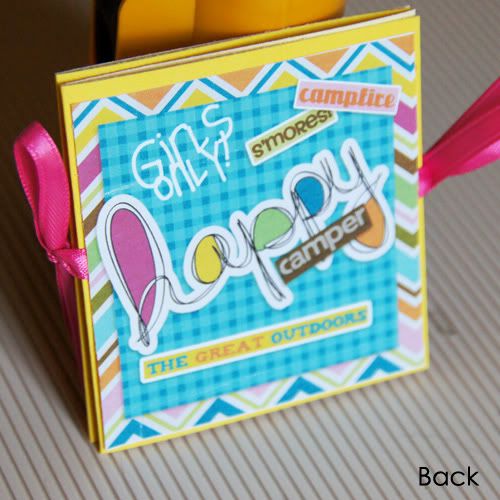
I've been scouring the Internet for ideas for the party and while I did come across some pre-made invites that were kinda cute I can't pass up the opportunity to make her invites.  I can't remember the last birthday party we had where I didn't make the invites.  It's a tradition!  I'm now looking for party supplies, games, activities and more activities so that the girls will stay entertained throughout the night.   Check back in over the next few weeks more details on the party - for now...enjoy these cute little invites I came up with.  Who wouldn't want to come to party with a fun invite like this?

Theme: Camping Sleep Over
Colors: Turquoise, Pink, Yellow and Purple


Here's how I put this together.
Supplies:
Happy Camper digital scrapbook kit by Jenn Barrette at Sweet Shoppe Designs
Photoshop Elements 7
White Printer paper and inkjet printer
Fiskars paper trimmer, scissors, Scotch tape, tape runner
12 x 12 yellow card stock 
Pink ribbon (Michael's)
Martha Steward Score Board

1.  I opened Photoshop Elements and created a 3 in x 3 in canvas to design on.  I started by designing the front and back panels at 3 in square each.  I then designed the inside panels at 2.75 in x 2.75 in each. 
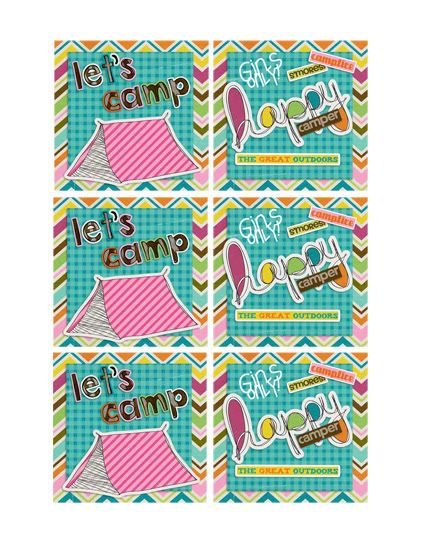
2.  Copy each panel and layout on 8.5" x 11" sized canvas in Elements.  Repeat for how many invites you need.  I ended up putting all the fronts and back on one piece of paper and all the insides on a seperate piece of paper.  (see my print sheet below)
3. Print out using a color printer on to white printer paper. 
4. Cut out all the panels using a paper trimmer and set aside trimmed panels.
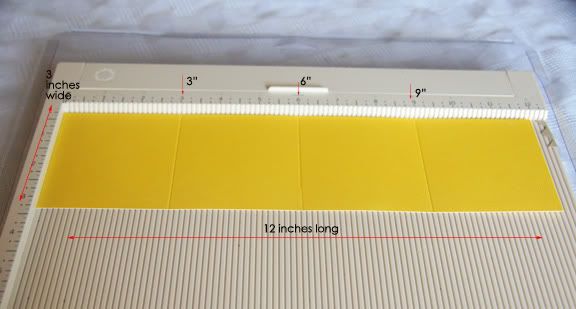
5.  Use the paper trimmer to cut a 3" wide x 12" long piece of cardstock from a 12 x 12 piece.
6.  Use the Score Board to score at 3", 6" and 9" along the 12" side.  (see pic below)


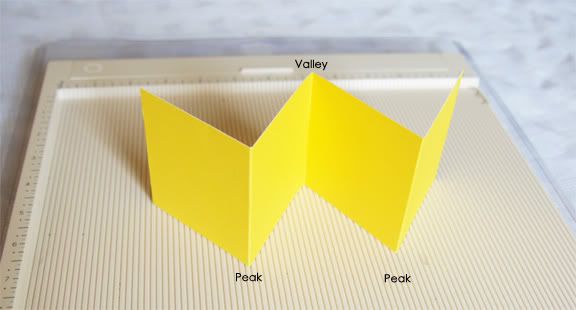
7.  Fold the cardstock strip to create 2 peaks and 1 valley (see pic below)


8.  Adhere inside panels on to the folded invite using a tape runner or your favorite adhesive.
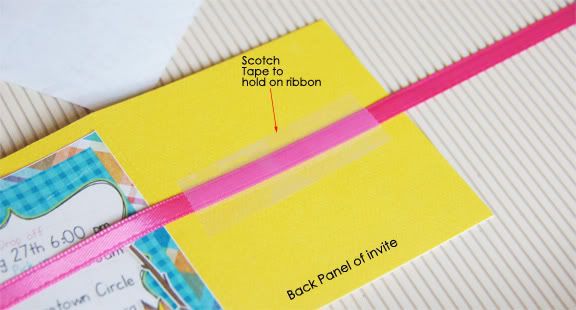
9.  Before adhereing the front and back panels I adhered a 12 in. piece of pink ribbon using Scotch tape to both panels.


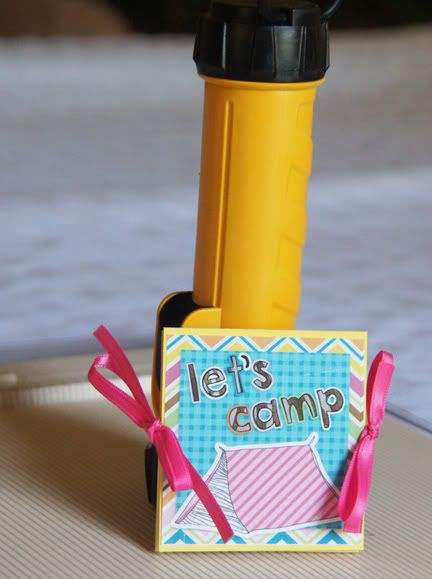
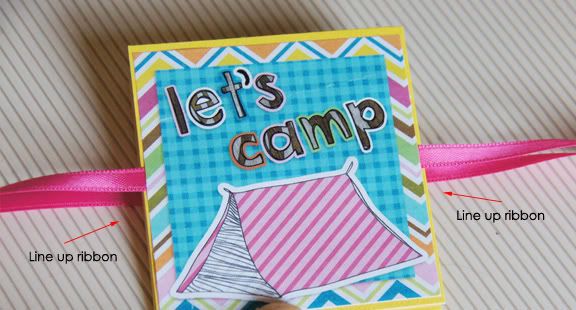
 I made sure that the ribbon lined up so that when the invite is closed the two pieces will come together on each side to tie the invite closed.  (see pics below)


10.  Adhere the front and back panels over the ribbon using tape runner or your favorite heavy duty adhesive. (You don't want the force of tieing and untieing of the ribbon to rip off your decorations.)
11.  Tie each side of the invite closed, slip into an envelope and you are set to delivery a party invite that is sure to get your guests excited about their upcoming adventure!

More pics


Wednesday, October 06, 2010

Treat Bags and Boxes Part III
Today I have two more cute Halloween themed treat boxes for you.  I'm having so much fun creating these...I'm going to have to find some new friends so I have enough people to hand these out to when this is all done.  LOL!

My first box is actually one I created last year and it's one of my all time favorite hybrid projects. 

My not so scary Dracula fang teeth box, uses a simple coffin box template I found HERE.  I printed the box template and constructed the box out of SU Basic Black cardstock.   I then worked from the template to create the box cover in Photoshop Elements.  I cut out the bat and bent its wings a little before adhereing to the box front.  I then created a slim card to slide in side -he,he...love the saying!  I filled the box with some Carmel Apple Candy Corn that looked like bloody fang teeth (well at least a little).  What a cute little box to give to someone with a little sense of humor!

My second project for today using a cutting file for a box...the only thing is I didn't use my Cricut!  That's right.  A lot of the cutting files you can purchase for electronic cutting machines also .PSD files that can be used in Photoshop Elements (or other photoeditting software).

 I used The Cutting Files' Gift Basket template/cutting file to create this cute little party cup.    The digital kit I used is called Scary Confectionary by Julie Billingsley and Traci Reed available at the Sweet Shoppe.  I love the fun colors in this kit!!! 

To create the little treat basket I just opened the cutting file in Elements and then used it as a clipping mask to create the final project.  I made sure I used large shadows to keep the elements/decorations looking realistic.  I then printed out on to presentation paper and score, folded and assembled my box.  I chose to fill my little treat box with the yummy Ghost Marshmallows (which look oh so cute floating in hot cocoa!).  I think these are perfect little cups to put on a table for a party!

I'm working on part IV of this series, so check back with me closer to the weekend for the next installment.  Until then...happy hybrid crafting!!!

Friday, October 01, 2010

Treat Bags and Boxes Part II

Today I have a quick and easy trio of treats that are pefect for slipping in a little fun sized candy bar or a small bag of mixed treats.  These cute little pumpkins are basically made out of a modified matchbook template that stands up to allow your treats to be tucked inside.  These little pumpkin treats are economical to make too - you can get three to a print sheet so there is not alot of paper used to make these babies!


I used Penny Springmann's I Want Candy digital kit to create these projects.  It was the perfect kit because she includes lots of cute pumpkin eyes, notes and mouthes to decorate the pumpkin face. 

Here's how to make these cute little treat boxes:
1.  Use THIS TEMPLATE to create three strips of orange paper to be your base of your pumpkin.
2.  In the section marked face, create the face of your pumpkin.
3.  Lighten the scoring lines to blend a bit with your paper and delete the text layer. 
4.  Print your pumpkins, trim, score and fold.
5.  I added some felt ribbon for the stem and then some green with white polka dots ribbon tied in a simple bow for the leaves.  You could even skip this step if you wanted. 
You're done - really it's that easy!


Wouldn't these be super cute to hand out to class full of kids or even at work.  You can adjust the width of the bottom fold (where the candy sits) to accomdate a larger or small sized treat.  If you are traveling with these I do suggest you adhere your treat to the bottom of the box so that you don't have candy flying everywhere (not that happened to me or anything.  LOL!)

If you'd like to see some more cute ideas for packaging....check this out!  The Blackberry Vine

Sunday, September 26, 2010

Treat Bags & Boxes- Part 1

I honestly believe that the most simple way to brighten a person's day is by giving them a little note or gift.  Over the next week or so I'm going to share some of my ideas for treat bags and boxes.  For me little tiny boxes and bags are my favorite hybrid projects.  I am a person that likes to "collect" packaging and then upcycle them into little gifts and projects. 


Today I used Lliella Design's adorable Boo kit to create two different treat boxes using recycled acrylic boxes.  The first box started life as packaging for a 4-pack of tape that my daughter got on clearance at Michael's. 


I added a paper band, flanked by some punched edge strips of orange paper.  I topped that with a pumpkin that I raised with a pop-dot.  The top of the box had a little fap that was used to hang the tape from a display hook.  I simple covered that with a larger piece of white cardstock and then a simple wrap around that says sweet treats.  I filled the back of the box withe some white tissue and then put the Tootsie Rolls in the front so I didn't have to use so many to fill the box. 

My next project is a recycled party favor box.

 I used the same Boo kit but this time chose a black damask paper and a cute little owl.  I created a rounded text box in Elements and then stroked the outside with a hot pink.  I used Darcy's Coffeeshopped Buzzed font in different colors to type "Save the Hooters".   Inside are "red" Starburst as a little "pink" reminder that October is Breast Cancer Awareness month and it's time to "check your hooters"! 

Check back in with me tomorrow for some other kinds of little treat bags and boxes sure to put a smile on your face (and someone elses).